

FlowAlp Shift
FlowAlp Shift — Quick Start Guide
June 30, 2026
Sign in, create your first event, and explore the admin control center at shift.flowalp.com.
FlowAlp Shift helps organizers plan activities, shifts and volunteer teams for events. This guide walks you through signing in, creating your first event, and exploring the admin control center at shift.flowalp.com.
Screenshots show the English interface. Shift supports English, Italian, German and French — use the language menu in the header to switch.
What you'll learn
- Sign in as an organization member
- Create a new event for your organization
- Navigate the admin dashboard and core features
Before you begin
- An organization on FlowAlp Dash (dash.flowalp.com) with access to FlowAlp Shift
- Organization admin or owner role to create events
- A modern web browser (Shift is fully web-based and works on phone, tablet and desktop)
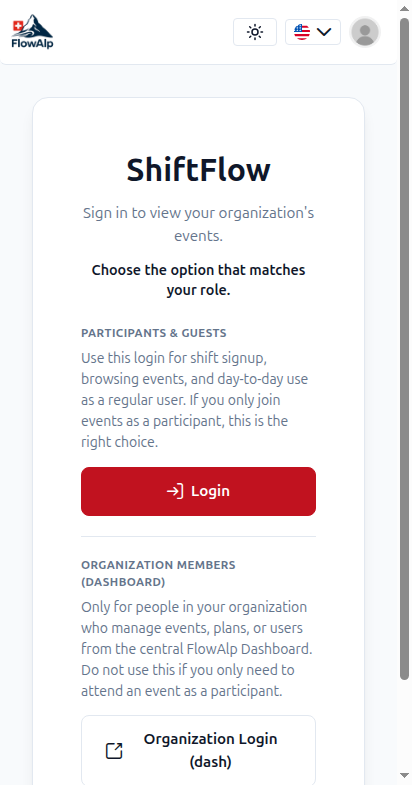
Step 1 — Sign in at shift.flowalp.com
Open https://shift.flowalp.com. If you manage events for your organization, click "Organization Login (dash)" — this uses your FlowAlp Dashboard account (Keycloak). Participants and volunteers should use the standard Login button instead.
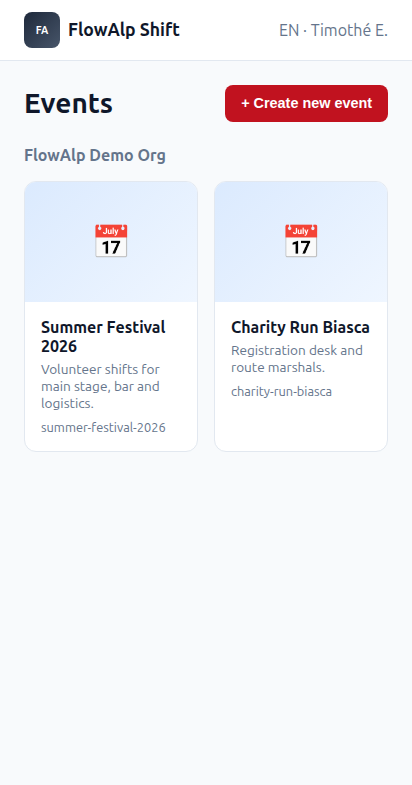
Step 2 — View your events
After signing in with your Dashboard account, you see all events linked to your organizations. Click Create new event to start, or open an existing event card to manage it.
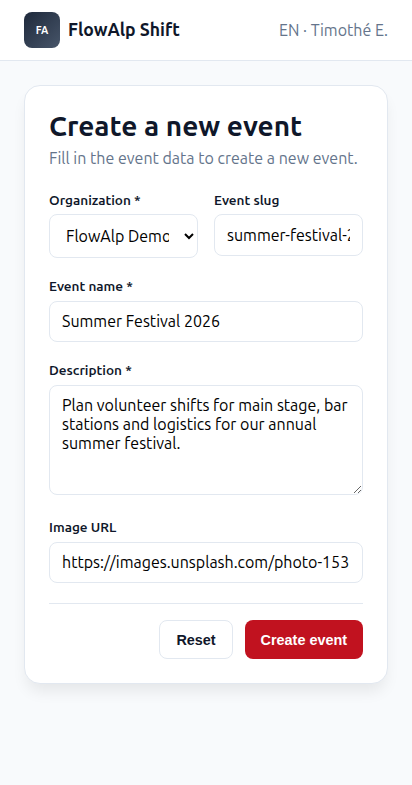
Step 3 — Create a new event
Fill in the event details: select your organization, choose a URL slug (letters, numbers and dashes only), enter the event name and description, and optionally add a cover image URL. Click Create event when ready.
- Organization — the FlowAlp org that owns this event
- Event slug — used in URLs, e.g. shift.flowalp.com/events/summer-festival-2026
- Event name & description — shown on the public event homepage
- Image URL — optional cover photo for event cards and the public page
Step 4 — Open the admin control center
After creating an event, open it from the events list. As an organizer, go to the admin area at /events/{slug}/admin to manage activities, participants, shift registrations, email templates and reports.
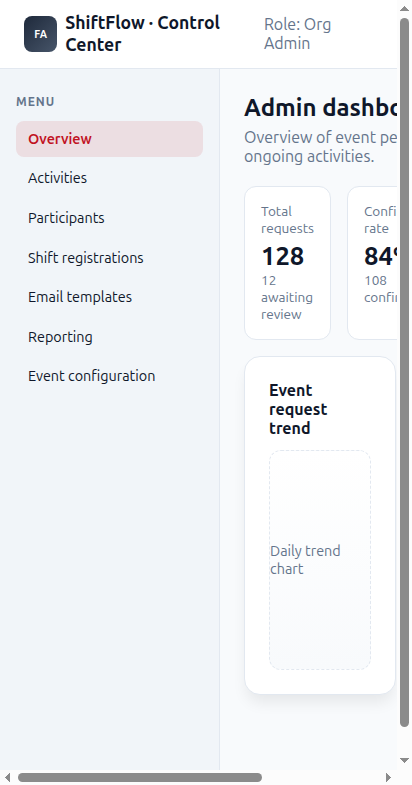
Key features
- Activities — define stations, areas and shift slots with capacities and requirements
- Participants — manage users, custom fields and roles for your event
- Shift registrations — review, confirm or waitlist volunteer sign-ups
- Email templates — customize notifications sent to participants
- Reporting — charts and exports for request trends and capacity fill
- Event configuration — registration rules, auto-accept and multi-registration settings
Public event page
Each event has a public homepage at shift.flowalp.com/events/{slug} where participants browse activities and sign up for shifts. Share this link with your volunteers after you publish activities.
Next steps
- Create activities and shift slots in the admin area
- Invite team members via FlowAlp Dash organization settings
- Visit flowalp.com/shift for product overview and pricing
- Contact support@flowalp.com if you need help onboarding your first event
App URL: https://shift.flowalp.com · Product page: https://flowalp.com/shift/